

We made it to the end! It was a marathon of patterns.
The pattern link will be at the end of the monthly post until it expires.
The free pattern download will be available on this page from the 15th until the end of the month. After the end of the month, the new pattern will be available as PDF pattern from our Etsy Store or purchase the paper pattern from our online store at materialgirlfriendsshop.com Get it while it’s free!
___________
December 15
Wow. We made it. There were a few times I wasn’t sure I could keep up. But we did it together! Introducing our last free pattern download for the 2025 Sew Along, The Peel Appeal Runner. From December 15 through December 31, you can download this pattern for free. The pattern download link is at the end of the December 15 post.
This striking design looks complex, but the secret is—it’s delightfully simple to sew. The playful peel appliqué shapes and bold layout create a runner that’s both modern and timeless. Perfect for dressing up your table for special occasions or everyday style, this project will impress your friends with surprisingly little effort.
But it looks hard.
Nope. I promise, it is much easier than it looks. First, lets select the fabrics.


Picking Your Fabrics
You need more than three yards for this one. I just couldn’t make it work for a 3YD pattern. I tried.
Fabric Requirements
- Twenty 10” squares of accent color (bright blue) for the Peels Appliqué OR 1/6 yard of ten fabrics OR 1 1/4 yards of one fabric
- 1 yard of dark for background Quarter Square Triangles (black)
- 1 yard of light for background Quarter Square Triangles (white)
- 1 yard for backing
- 3/8 yard binding
- 2 1/2 yards of fusible interfacing light for peel fusible appliqué method, or use your preferred method.


Construction Tips
Simply put; first you’ll make your background squares. Second, you’ll prepare the peels. Next, fuse the peels to the background squares. Top-stitch the edges of the peels. Lastly, sew the blocks together! Ta-da! Easy as pie. However, pie isn’t that easy. Lets get you more details. If you’re good at making pies, you can skip to the download.
First, the Background Squares
Start by cutting your 7 1/2″ squares. Draw a diagonal line on the wrong side of the light square. Pair with a dark 7 1/2″ square and sew 1/4″ on each side of the drawn line. Cut on the drawn line and press the seam to the dark. There! You have two Half Square Triangles.


Next, pair the two Half Square triangles right sides together so that the dark triangle is over the light triangle and you can nest that seam nice and snug against each other. Draw another diagonal line on the wrong side of the Half Square Triangle, this time it is in the opposite direction of the seam. Pin, then sew a 1/4″ on each side of the drawn line. Cut on the drawn line. Wow! Two quarter-square triangles all done. Repeat to make a total of forty Quarter Square Triangles and trim them to 6 1/2″.


Sew four together to create the background block. Make ten of those. The block should measure 12 1/2″. Looking good.


Second, Prepare the Peels
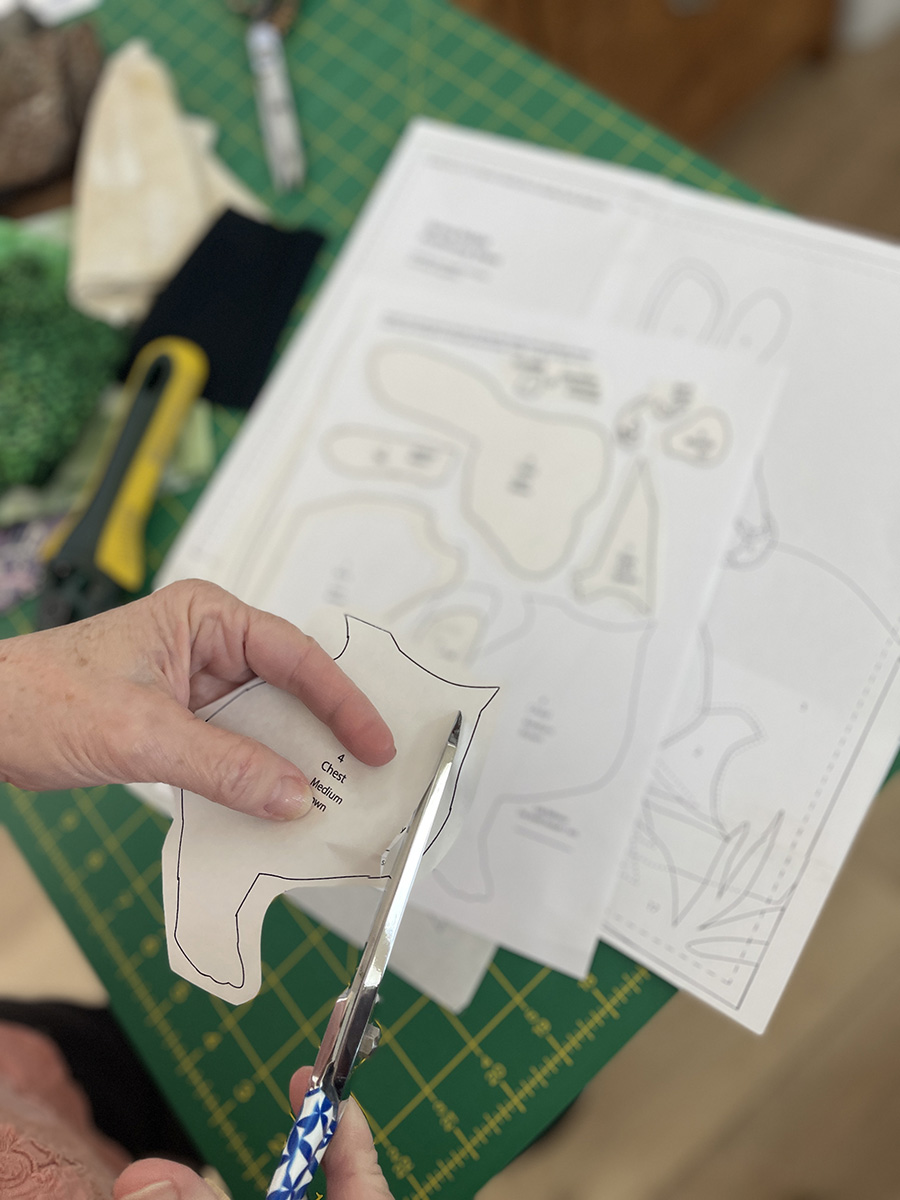
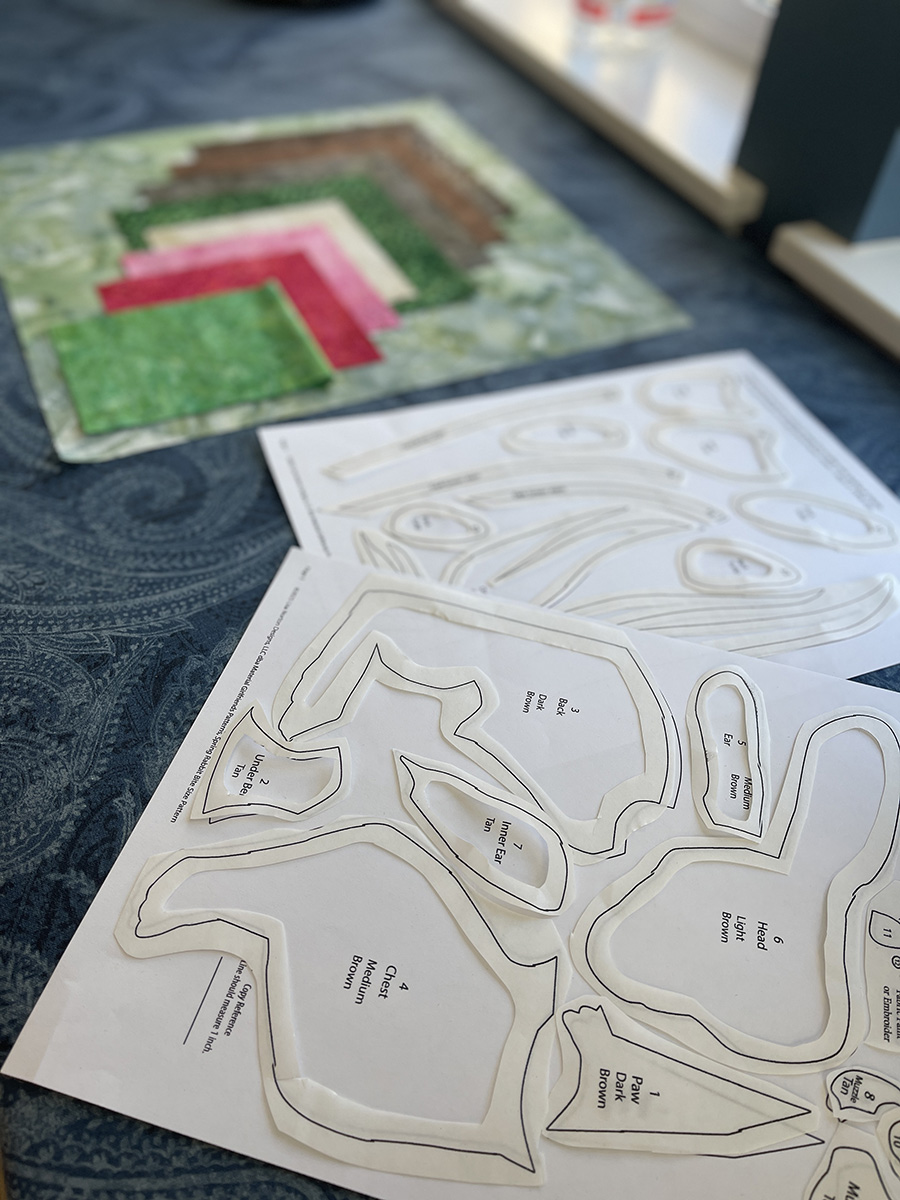
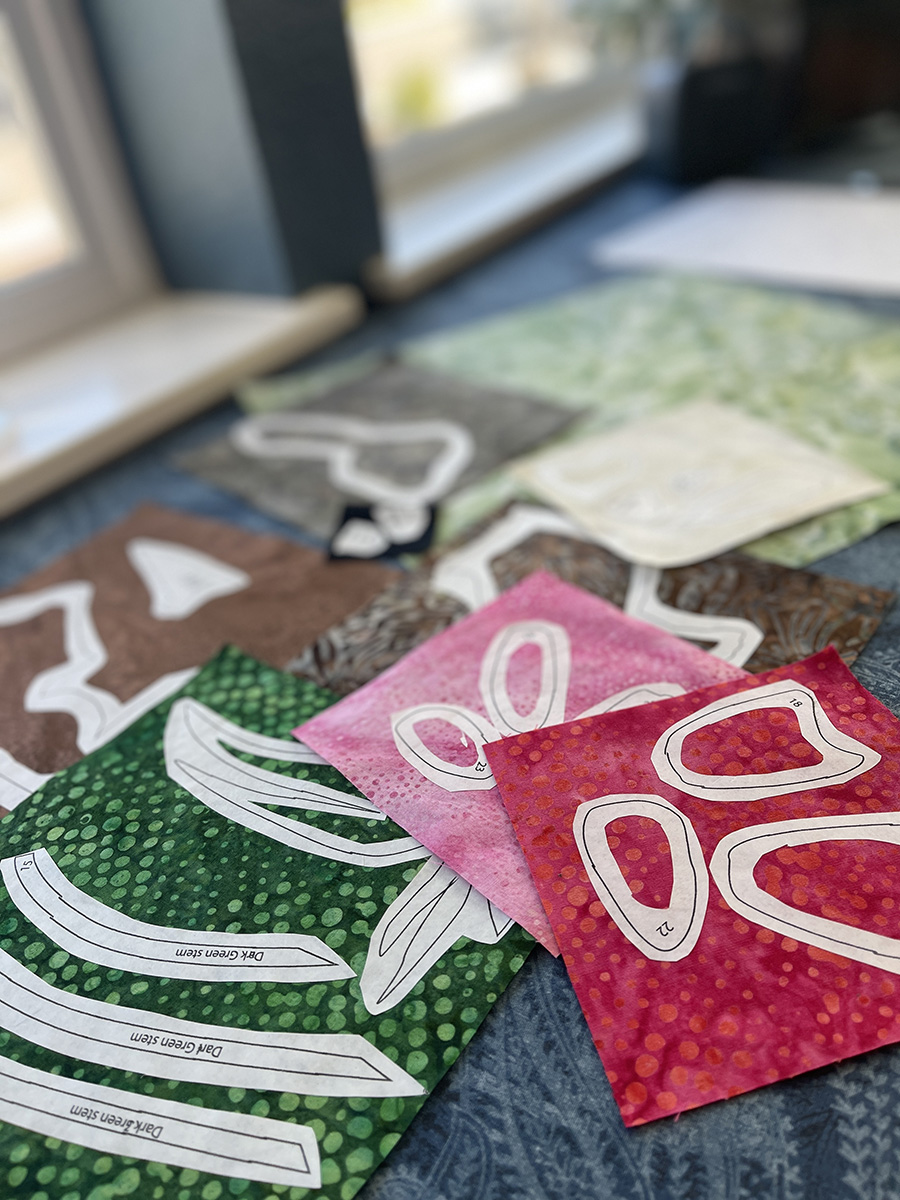
I like using light fusible interfacing. It has the fusible bumps on one side. The brand I use is Pellon 911FF Fusible Featherweight – white Apparel Interfacing. I use it for t-shirt quilts too. There are several types, just keep it light (featherweight). Trace forty peels on the smooth side of the fusible interfacing. Leave at least 1/2″ between peels. I used leftover 10″ layer cake squares for my runner.
Layer right sides together. The bumpy side of the single-sided fusible interfacing faces the right side of the fabric. Pin in the center of the Peel and sew on the traced line. Trim about 1/4″ outside the stitched line. More details are in the pattern. Snip a small slit in the interfacing and turn right side out.


Fuse the Peels
Position four peels on the background square and fuse in place with a hot iron. Just be careful to keep the interfacing from showing along the outside edge of the peel and 1/4″ from the edge for the seam allowance! Top stitch with a zig-zag or blanket stitch and sew your blocks together! Easy as pie. 😉 I’m so proud of you for trying this one!


A Simplified Version
I like how the Quarter Square Triangle looks with the appliqued peels. However, Half Square Triangles look really good with the peels too. This is a runner I made a couple years ago. You could always just make Half Square Triangles instead of Quarter Square trimmed to 6 1/2″ and make a quilted runner similar to this one.


Download Your Free Copy
Click on the link to download the PDF file for The Peel Appeal pattern. The link will expire on December 31, 2025. Sorry you missed it. You can find the pattern at https://www.materialgirlfriendsshop.com/
November 15
Our November free pattern download is ready! From November 15 through November 30, you can download our new 3YD Sierra quilt pattern — absolutely free. The pattern download link is at the end of the November 15 post.


Picking Your Fabrics
You need three yards, plus 1/2 yard of binding, and 1 2/3 yards of backing.
- 1 yard of Light (light blue batik)
- 1 yard of Medium (medium blue snowflake batik)
- 1 yard of Dark (Cobalt blue tree batik)
3YD Sierra would look amazing in many Christmas, forest, or wintry color combinations. Using EQ8 software, I created an O Tannenbaum quilt plus two more “Christmas” versions using outlandish prints. The bottom three versions, I used wintry batiks. In the last one, did you notice I switched the fabric placement? I swapped the Light and Dark fabric placements – instead of dark trees, I made them snow white. What will you choose?


The fabric cuts for the tree are 7″ square and are somewhat large. Therefore, a medium to large print fabric works great. However, for the background, I don’t recommend directional prints (like words) because half your blocks will have the print upside down. If you use a batik, there is no worry because you can use either side of the fabric.
Construction Tips
We created a beginner foundation paper-piecing video for you! We love paper-piecing so that much we want you to try it. Even if you were unsuccessful before, perhaps my method will click for you. If my method doesn’t jive with your brain, there are many other methods on YouTube that you can try. Don’t give up!
The nice thing about paper-piecing is that the construction techniques can be so varied from quilter to quilter! If you try several different methods, you may find the technique that is perfect for you.
My disclaimer: I tend to be skimpy on my cutting because I don’t like to waste much fabric. By pre-cutting your fabrics according to the cutting map in the pattern, you’ll have enough for the 32″ x 48″ size. The fabric amount is tight! So if your method is a bit more wasteful, you may have a shorter quilt. 😉
Download Your Free Copy
Click on the link to download the PDF file for the 3YD Sierra pattern. The link will expire on November 30, 2025. Sorry, you missed it. For a printed copy, visit our online shop or for a digital download, Material Girlfriends’ Etsy shop.
___________
October 15
Our October free pattern download is ready! From October 15 through October 31, you can download our new 3YD November quilt pattern — absolutely free. The pattern download link is at the end of the October 15 post.


Pumpkin Spice
I made a pumpkin spice sourdough loaf yesterday. Wow, it was good. Pumpkin spice is a key ingredient in all things Autumn. There is plenty of pumpkin spice in our new 3YD November pattern! Check out the maple leaf blocks sewn in Hoffman’s chai batik and a yummy dark spice batik by Riley Blake.
Silly me, I picked this dark batik and then found that it was discontinued!! Ugh. Don’t worry, Riley Black had another autumn brown that will look awesome in this pattern. Check here for the 3YD kit. All our 3-yard kits include an extra 1/2 yard for binding. Enjoy free shipping!

Picking Your Fabrics
You need three yards, plus 1/2 yard of binding, 1 2/3 yards of backing.
- 1 yard of Light (light gold)
- 1 yard of Medium (chai – burnt orange)
- 1 yard of Dark (Dark brown batik)
3YD November would look amazing in many fall color combinations. Halloween is just around the corner. Our northern neighbors just celebrated Thanksgiving a couple of days ago. Check out the fall Canadian red Maple Leaves! I created three more fall versions using batiks, pumpkin print, and fall leaves. It’s hard to decide! What are you in the mood to sew?
Because the block pieces are small, I’d recommend small to medium prints. The larger prints won’t show off well.


Let’s Get Scrappy
3YD November is fun to make scrappy too! Check out Lora’s runner. She collected various earthy batiks from her stash. You don’t need much for a Maple Leaf block! Lora made four of the Maple Leaf blocks and sewed them end-to-end with sashing between. It is perfect for Thanksgiving celebrations.


Construction Tips
You’ll be making the Half Square Triangles (HST) using the two-at-a-time method. The HST will be slightly over-sized. You’ll need to trim them to size. However, you should be trimming slivers and triangle corners only.
One of my favorite tools to use when trimming HSTs is the Bloc-loc square. The square has a small ridge on the back so it butts against the diagonal seam of the HST. This is important because you need that seam to remain corner to corner when trimming! A quick tip for alignment; if seams are pressed to the dark, then the Bloc-loc logo will always show against the lighter fabric.
No Bloc-loc? No worries. Use your smallest square. Align the diagonal guideline along the seam line. Align and trim slivers. Rotate the HST. Align the diagonal guideline again, trim at 2 1/2″ square.
Check your local brick and mortar quilt shop for Bloc-loc tools. I enjoy the 2.5, 4.5, and 6.5 Bloc-loc HST squares as well as three sizes for flying geese. The Bloc-loc rulers are pricey!! Start a Christmas list for Santa. They’ll be worth the wait.


Download Your Free Copy
Click on the link to download the PDF file for 3YD November. The link will expire on October 31, 2025. Sorry, you missed it. For a printed copy, visit our online shop or for a digital download, Material Girlfriends’ Etsy shop.
___________
September 15
Our September free pattern down is ready! From September 15 through September 30, you can download our new 3YD Mike quilt pattern — absolutely free. Pattern download link is at the end of the September 15 post.
Have you noticed our 3YD pattern series are named after call letters? We have 3YD Alpha, Bravo, Charlie, Echo, Foxtrot, India, Juliett, Lima, Mike is this month, November is next month, Papa, Quebec, Romeo, Sierra will be in November, Tango, Uniform, Victor, and Yankee. (We still have Delta, Golf, Hotel, Kilo, Oscar, Whiskey, X-Ray, and Zulu to design.) The series was designed as a nod to our armed forces, especially to my hard-of-hearing Lt. Col. father-in-law that would boom out these call letters anytime he was on the phone!


Would you believe me if I told you 3YD Mike is a confident beginner quilt pattern? It looks a little complicated with that Double Flying Geese unit. However, it is much easier to make than one would think. Lynn Wilder of Sew’n Wild Oats quilt patterns, and I used to work together at In Between Stitches in Livermore. She taught me an easy way to make that intimidating Double Flying Geese unit! No little triangles to sew, honest! Let’s go through the pieces.
Quit Construction
3YD Mike finishes at 42″ x 42″. The first unit to make is the Four-Patch. Sew a Dark and a Light 3 1/2″ strips together. Press to the dark. Trim units to 3 1/2″. Rotate one of the units. Sew together for the Four-Patch. It should measure 6 1/2″ square. Not too tough.

For the Half Square Triangles, draw a diagonal line from corner to corner on the light 7″ squares. Lora like to use the 1/2″ rulers to draw two lines that you sew on rather than one line, where you’d sew 1/4″ inch from each side of the drawn line. Pair with a Dark. Sew, press, and then trim. Don’t forget to trim to 6 1/2″. It should just be shaving just slivers of fabric. I like using the Bloc-loc 6 1/2″ square.


Next is the Square-in-a-Square unit. Cut two Light 7″ squares once on the diagonal for four triangles. Crease the center of the triangles by folding in half. Crease the square as well. Align your creases and pin. Sew two sides at a time. The side triangles will overlap the top and bottom triangles sewn.


Lastly you’ll create the Flying Geese and the Double Flying Geese units. Draw a diagonal line on the wrong side of the Light wing square, position, sew on the line. Trim away the extra (but save those triangle to make smaller HSTs for a pot holder or placemat!) Press the wing before positioning the next square on the other end. The square will overlap the corner of the previous square. You’ll make eight of these.


Once your Flying Geese are sewn, you’ll repeat the same method as above to add additional Medium Green triangles! Easy-peasy or at least not as hard as it looked.


That’s it. Sew the units together and your quilt is complete. I had no problem sewing this in a day. I think most quilters could get the quilt top done in a weekend, thus making it a fast baby quilt gift!! 😉
Picking Your Fabrics
We made 3YD Mike from Hoffman batiks and created kits to sell online if you love the combination as much as we do. Kits include 3 1/2 yards, 1 yard of each of light, medium and dark batiks. We always include a 1/2 yard of binding in our kits too (dark green stripe batik). The kit doesn’t include the pattern, backing or batting.
- 1 yard of Light (Light Green batik called “Sugar”)
- 1 yard of Medium (Mossy Green batik)
- 1 yard of Dark (Dark Green batik) The kit includes the same dark green as the quilt on the fence photos. The Dark Green in my sewing samples above were from my scrap bin.
3YD Mike would look amazing in many color combinations. A cool evening breeze has been promising the arrival of fall. Hmm, pumpkin spice anyone? Halloween is just around the corner. Christmas fabrics have been calling to me, yet the large blocks would show off a large floral fabric. It’s hard to decide! What are you in the mood to sew? Here are some digital inspirations to consider.


Get it while its Free!
The 3YD Mike download link expires September 30, 2025.
___________
August 15
August’s Free Pattern Download — 3YD Foxtrot
Our August free pattern download is here! From August 15 through August 31, you can download our new 3YD Foxtrot quilt pattern — absolutely free. Pattern link is at the end of the August 15 post.
Why 3-Yard Quilts?
We love 3-yard quilts for their simplicity, flexibility, and fast finish. There’s no guessing about fabric amounts, and they’re perfect for stash busting or quick gift-making. Whether you’re prepping for fall, sewing for charity, or refreshing your favorite chair with a cozy new throw, this pattern checks all the boxes. 3YD Foxtrot finishes at 40″ x 60″—the perfect size for cuddling on the couch, or keeping in the car for your next road trip or picnic.


Want your project to look just like our sample? We have kits available featuring the same rich batik fabrics from Hoffman Fabrics. Kit includes all the fabrics for the front, plus an additional 1/2 yard of solid gold for binding. Kit doesn’t include backing and batting.

Enjoy Free Shipping too!
Need a little inspiration?
Try these combos:
- Navy, sky blue, and white for a breezy coastal vibe
- Charcoal, peach, and linen for a modern farmhouse look
- Teal, tomato, and mustard for rich retro charm
Check out these version created with my EQ8 software.


This would also be a very fun to make scrappy out of your stash too!

Share the Love
Have a quilting friend who’s just getting started? Share this post with them! This pattern makes a great beginner project and might just turn them into your next stitching sidekick. Download link expires August 31, 2025. Sorry you missed it! You can find a printed 3YD Foxtrot pattern on our web store or as a digital download on our Etsy store.
___________
July 15
July’s Free Pattern Download — Home on the Road Runner
Our July free pattern download is here! From July 15 through July 31, you can download our Home on the Road runner pattern — absolutely free.


Measuring 44″ x 17″, this playful runner features a mix-and-match combination of blocks: traditional piecing, easy paper-piecing, and raw-edge fusible appliqué. You can make all the blocks or pick your favorites to customize your project.
We’ve also included links to helpful video tutorials for both the paper-pieced house block and the fusible appliqué blocks, so you’ll have extra guidance along the way.
Want your project to look just like our sample? We have kits available featuring the same cheerful fabrics, including the adorable travel trailer print from Riley Blake Designs. Kit includes all the fabrics for the front and binding. Kit doesn’t include backing and batting.

Customize Your Runner
Make all the blocks, or pick your favorites to customize your runner. If you don’t do the travel trailer thing, eliminate that block for a shorter runner. Check out these variations.


The house is my favorite block. What a cute runner it would be with all paper-pieced houses. (These runners are Photoshop’d, by the way.) I’d make the houses in different fabrics and switch the tree fabrics up a bit too for a very homey runner. Lora’s favorite block is the center appliqué block. The mini appliqué runner is a perfect size for the RV nightstand or a kitchen table place mat!
Let’s Get Sewing!

Because Home on the Road includes a variety of techniques, we have a couple of YouTube video tutorials to share.

The pattern starts off with the traditionally pieced Cabana blocks. This block is pretty straightforward. There are lots of colorful diagrams and step-by-step instructions to get you through this block. We have basic piece work tutorials if you’re looking for extra tips.
Next up is the paper-pieced house. The video isn’t the same house, but it’s the same technique. I like to pre-cut all my pieces before starting. The sizes of each piece are provided in the pattern.

Raw Edge Fusible Appliqué is the technique we used for the appliqué blocks in this runner. Of course, you can use any method you prefer. If not using the fusible appliqué method, add seam allowance to the appliqué pieces (reversed templates included in the pattern).

The video tutorial? Yes, those are Canadian Geese, not a van and RV. But the technique is the same. We have 91 video tutorials to help you. They don’t generate an income for us (don’t you hate the ads?!). They are not super professional. We don’t have a camera studio with cameramen and mics. We made these videos to keep you company while you sew and to help if you get stuck. Lora and I are visual learners. We understand that a quick video tutorial can save you hours of frustration and mistakes. Oh, and the camera adds 20 lbs and wrinkles. We’re a lot thinner and younger, if only in our minds.

After you’re done fusing the appliqué, top stitch with a blanket stitch in a coordinating thread color. I like Aurifil 30wt., but shiny, heavier thread, bigger stitches, smaller stitches, it all boils down to personal preference. There is no wrong method. I’d recommend testing your stitch on a scrap first, then write your setting down on your pattern. That way, when you come back to the project, you’ll know what you were doing!
Download Your Home on the Road Pattern
Grab your free download and hit the road with this runner as your project this month! Click below to download your copy of the Home on the Road quilt pattern. Send your friends to collect their free download too. This free download expires July 31, 2025. It’s a large file – 10 pages! Sorry, the link expired. Get your digital download at our Etsy store!
___________
June 15
We’re officially half way through our 2025 Sew Along downloads. That has gone fast, right? Quick overview. January was the My Little Cottage Table Topper (It is free all year, btw. You’ll find the download link at the very bottom of this page at the end of the January 15 post), then we had the Double Irish Chain in February. I made a king size for my niece’s wedding present. March arrived with Spring Rabbit, a 12″ mini quilt. In April we made the Weathervane Flowers Runner. Last month, May, was the 3YD Papa quilt. Did you make one for a special dad in your life? For June, we’re marching in with 3YD Yankee. Just in time to make and use for Independence Day fireworks.


3YD Yankee is created by making a total of twelve Yankee Puzzle blocks. The Yankee Puzzle
quilt block is a classic, versatile design cherished by quilters for decades. Originally published
in Ladies Art Company in 1897, this block features a striking geometric layout that lends itself
well to a variety of quilting styles.
Pick Your Fabrics
Fabric amounts for this quilt are tight! You need a yard of a Light, Medium, and Dark, as usual. However, if you’re prone to mis-cuts or like to prewash, but an extra 1/8 yard. There is a cutting map on page 1 of the 3YD Yankee instructions (found at the end of this June 15 post). You need 42″ of usable yardage. That means after you trim off the selvage, you still have at least 42″ x 36″ to work with. Lora was trimming off her selvage and was way to generous with her cut. She gave herself less than the required 42″. No problem, as a resourceful quilter, she just pieced her missing square from some of the leftover fabric. You can too!

I chose super cute Red/White/Blue prints from Riley Blake. The prints were not too busy and more tone-on-tone. Since the blocks have small piecework, a smaller print allows for strong contrast. Yes, we do have kits! Find the 3 yards plus the binding for $45.99 here.
Though the red, white, and blue is my favorite combo for this Yankee Doodle Dandy, I did play with different color palettes using my EQ8 software.


Let’s Get Sewing!
The Yankee Puzzle block is make up of Half Square Triangle – LOTS of Half Square Triangles. The number of Half Square Triangles is a bit daunting. I dread tell you how many. I fear you’ll quit before you even start! Ha! There are 16 Half Square Triangles in each block. Twelve blocks x 16 HSTs each is 192 HSTs. You can do it! You’ll make two at a time. Refer to the Weathervane Runner post below for construction tips.


Since there are eight fabrics instead of just four at the center intersection, Lora spun the seam to allow for a flatter block. It’s that a cute tiny pinwheel? https://www.youtube.com/watch?v=VHKj542GDF
Download Your 3YD Yankee Pattern
Click below to download your copy of the 3YD Yankee quilt pattern. Send your friends to collect their free download too. This free download expired, July 5, 2025. Get your digital download at the Material Girlfriends’ Etsy store.
___________
May 15
Yay! We have a free 3-yard pattern to download this month! Introducing 3YD Papa. Our 3YD series is named after the military call letters (Alpha, Bravo, Charlie, Delta, Echo, Foxtrot, etc.) as a nod to my father-in-law. He wouldn’t spell anything out loud without using the full military call letters. We started the 3YD series soon after the Colonel had been promoted to the special reserves for Marines stationed in Heaven.
Today we’re releasing 3YD Papa and we’ll release 3YD Yankee, 3YD Foxtrot, 3YD Mike, 3YD November, and 3YD Sierra in following months. You can find the published patterns from this series here. I can hardly wait for you to see new the line-up.


Our dad is called Papa by the grand kids and great grand so this design and color palette had a specific person in mind. 3YD Papa quilt pattern is created by making a total of twelve Father’s Choice blocks, six blocks in each of the two colorways. The Father’s Choice quilt block is a classic, versatile design that has been cherished by quilters for decades. Originally published in The Quiltmaker’s Handbook: A Guide to Design and Construction by Michael James in 1978, this block features a striking
geometric layout that lends itself well to a variety of quilting styles.
To make this a 3-yard quilt pattern, the cutting is tight! The pattern includes a cutting map for your reference. Cut strips in the order listed. Always cut largest pieces first. Why? If you make a mistake cutting a large strip, you can use that mis-cut strip to cut out some of the smaller units. Generally, when I cut out a pattern, I cut out my borders first, then my pieces. This way I know the amount of fabric I have left. I don’t have to worry about running short when I’m ready to add my borders.
As sewing techniques go, the Father’s Choice block is similar to the Weathervane block from last month. However, this block finishes at 10″. Scroll down to the April 15 post to review any Half Square Triangle construction tips.
Picking Your Fabrics
I made 3YD Papa from Hoffman batiks. We created kits to sell online if you like the palette. Kits include 3 1/2 yards, 1 yard of each of light, medium and dark batiks. We always include a 1/2 yard of binding in our kits too (navy). The kit doesn’t include the pattern.
- 1 yard of Light (Cream batik)
- 1 yard of Medium (Mossy Green batik)
- 1 yard of Dark (Navy batik with hints of Mossy Green throughout)
A little Electronic Quilt magic (EQ8), enables us to previous what 3YD Papa would look like in some other prints and colors. I like the Christmas print one. The blocks look like presents.


Download Your 3YD Papa Pattern
Click below to download your copy of the 3YD Papa quilt pattern. Send your friends to collect their free download too. This free download expires, June 2, 2025. We’ll be hosting a baby shower and out-of-town family so you get a couple extra days this time! Sorry, link expired. You can purchase a digital download from our Etsy store.
___________
April 15
Our April free download is a new runner pattern by Material Girlfriends, Weathervane Flowers Runner. The Weathervane block was first published in the Kansas City Star in 1929 by Ruby McKim. Though this block is almost 100 years old, it is still a popular design, admired by traditional and modern quilters today. Each Weathervane block finishes at 12″.
I like long runners. I know, not everyone needs a 6′ runner for their dining table or buffet. If you don’t need a 6′ runner, just eliminate a block or three. If you want a 5′ runner, eliminate one Weathervane block. For a 4′ runner, eliminate two Weathervane blocks.


Picking Your Fabrics
This pretty runner is a 3YD pattern. Sort of. I made it from one of our 3YD kits we sell online. However, we always include 1/2 yard of binding in our kits. Technically, it is a 3.5 yard pattern. The half yard in this runner is the green print. For the Binding I used the half yard from the petal red fabric. This is what you need for the 20″ x 72″ runner.
- 1 yard of Light (I used a cream tone-on-tone print)
- 1 yard of Medium for the flower center and border (I used a floral print)
- 1 yard of Dark for the flower petals and binding (I used a darker red)
- 1/2 yard of Green for the ‘leaves’ of the flowers and flange

This is the kit I used. I loved the Riley Blake floral print, plus it went really well with three prints from one of the Material Girlfriends lines we designed for Marcus Fabrics. The line was called Scarecrow’s Song. The panel has been sold out and no longer in print but I still had some of the supporting prints. I do my best not to hoard save my favorites. Just take a deep breath, cut, and use them! I tend to save and pet them for a while first though. Did that come off as creepy? Nah, you totally understand.
Click this link 3YD Kit #14 is $45.99
What floral print do you have in your stash? You need a yard. Sunflowers, daisies, roses – look through to see if you’ve been hoarding a print just for this project. Hoarding? Excuse me, saving for just this perfect project.
Color Options
A little Electronic Quilt magic (EQ8), enables us to previous what this runner would look like in some other prints and colors.


We can’t wait to see what you choose! The Weathervane Flower runner will make a very nice gift. Mother’s Day is just around the corner. Share a photo of your runner with our Facebook Group.
Let’s Get Sewing
The download link is at the bottom of this April 15 post. Feel free to jump ahead if you want to print out your copy to follow along.
First you’ll need to cut your fabrics. There is plenty of border print so you can fussy cut your flower centers. Next draw a diagonal line on a million Light squares. This takes a long time so let’s take a short cut!

I’m working with my featherweight on this project. You’ll notice I use blue painters tape as a guide to align my fabric. My right eye has vision issues and the blue tape helps me to stay on the straight and narrow. If you have wobbly seams, give it a try. The blue tape edge should be 1/4″ from the needle.
Since drawing a diagonal line on the Light squares is tedious, I really appreciate the 1/4″ Diagonal Seam Tape. It save me so much time. No drawing lines! This light masking tape has 1/4″ lines printed on each side of a red center line. It costs around $5 and one roll will last a long time.

Align the red center line with your needle. Ready, set, sew. I keep my eye on the corner closest to me and keep it trailing along that red line. Sew slow, but it goes very fast when you don’t have to draw the lines! You can watch the 13 sec video above.
The pattern actually begins by making the green Half Square Triangle. However, I started with the red petals. Oh, well. Skip to the petals in your pattern or skip ahead to the green Half Square triangles. I’ve always had trouble following a pattern, even my own.
You’re going to position a Light square in the corner of the Dark petal square. Sew on the drawn line or use the Diagonal Seam Tape and sew on the diagonal. Trim 1/4″ from the drawn line to reduce the bulk. I always eyeball the 1/4″. I’m sure my trimmings are on the generous side and closer to 3/8″. You’re just trimming away the extra bulk. You don’t need to get out the ruler and rotary cutter for this.


Press it with the seam toward the Light fabric. Now you can add the second square to the other corner. Trim the extra fabric away with your nice fabric shears. Press the seam toward the Light fabric.
If using the Diagonal Seam Tape for making the Half Square Triangles, just align the corner with the 1/4″ black line instead of the red center line. You’ll want a 1/4″ seam on each side of the center diagonal. We also have a YouTube video on a few other ways of making Half Square Triangles.
Alignment
When you align your Half Square Triangle with the square, you need to ask yourself, “What’s the Point?” Your point is at each end of that diagonal seam. Align your Half Square Triangle on top of your Light square, right sides together. Align perfectly at the point. If it is slightly longer or shorter at the other end, it doesn’t matter. Don’t split the difference or align at the other end. If you can ease that little difference then super. Your accuracy is at the alignment of the point to the square. Sew with the Half Square Triangle on top. You should get a very nice 1/4″ from the edge to your point.


Ugh, I sewed three with the wrong side together. Time for the seam ripper.
Once all my units where ready, I made my piles and then sewed my blocks together. Add the sashing strips and then you’re ready for the green Flange.


Start by pressing the green Flange strip in half with the right side out. I used a little Best Press spray starch to make the fold good and flat. Trim the Flange to the width and length of your runner. Align the raw edges and pin in place.

Instead of the 1/4″ seam, you’ll want to sew a scan 1/4″ seam, 3/16″ of an inch if you can. Don’t worry too much about it being straight and accurate. You just need it less than 1/4″. Its just holding the Flange in place.


After the Flange is sewn on, add your floral border strips.

Despite trying to keep my 1/4″ seam scant, I still had a few stitches from the Flange stitching that I had to pick out. How did you do?
Download Your Weathervane Flower Runner Pattern
Click below to download your copy of the Weathervane Flower Runner pattern. Send your friends to collect their free download too. This free download expired, May 4, 2025. Download your copy from our Etsy store.
____________________________
March 15
Spring is almost here!! Just 5 more days and it will officially be springtime. The weather might not reflect spring’s arrival. You know what they say about March; in like a lion and out like a lamb. Our weather is currently roaring with wind and rain. Nonetheless, spring is on the way.
Our March free download is a new mini-quilt design by Material Girlfriends, Spring Rabbit. This petite quilt is just 12″ square and makes a darling spring decoration for your home.


Picking Your Fabrics
Understandably, when polled, quilters said choosing fabrics is one of the hardest parts of making a quilt. Here are our tips on choosing fabrics for this cute bunny. First, it was to represent spring so our greens and pink were going to be bright and crisp. We wanted a background that light enough to have enough contrast with the greens, pinks, and bunny fabrics. By layering our choices on top of the background we could see if we had enough contrast or if we needed to lighten or darken any of our choices.
You’ll notice that we chose three brown fabrics for the rabbit. All three are very close in value – just slightly darker or lighter. We used the middle value for the chest, lightest for the head and darkest for the body. It is slight but helps give the body depth. We don’t recommend using the same brown fabric for all three pieces (or white, gray, or black) for the rabbit. It will flatten him out.
When we were happy with the selection, I added small sample squares to our swatch sheet. Download your free swatch sheet page here. Just scroll almost to the end and it will be there. The swatch sheet helps me in recording what we used in the original and what fabrics to use when making kits. We do have kits in our online store – Spring Rabbit Kit.


Fusible Appliqué
Choose how you’d like to appliqué your mini-quilt. If you choose a different method than fusible appliqué be sure to add the seam allowance you need around each piece.
My favorite way to appliqué is to use the fusible web product that can go through my inkjet printer. I use HeatnBond EZ-Print Lite (Don’t use FeatherLite – not enough adhesive). It is about $8 or so for 10 sheets. Check your local quilt or craft shop. If they don’t carry it, you can surely find it online. It is NOT for laser jet machines. Those machines use heat and it will be a gummy mess (ask Lora!). You can also trace the already reversed images onto the fusible product with a fine-tip marker.

Make copies using the HeatnBond EZ Print Lite or trace them if not using an inkjet printer. I do one page at a time. The pages tend to miss-feed if I have more than one in the tray. Roughly cut out each piece leaving about 1/4″ on the outside of the line. Then trim about 1/4″ on the inside of the line. This method keeps the fusible appliqué from becoming stiff by removing the inside portion and leaving enough to seal the edges.


Once we have trimmed them, position each on top of the pattern pages. This way I can see if I missed cutting one out and can retrieve it from the trash before its too late!

Place your pieces on the appropriate color, on the WRONG side of the fabric. The nice thing about Hoffman batiks, you can’t tell what is the right or the wrong side. Both sides are lovely. I make less fusing mistakes this way! It takes just a tap with a hot iron. If you over fuse (pressed too long with the iron), it may not fuse to your background. (If that happens use fabric glue to hold it in place.) Next, trim each piece just on the outside of the line.
Use a Pressing Sheet
Also known as a Teflon sheet, a Pressing Sheet is a thin, non-stick thin plastic mat. It’s the same Teflon sheets used for baking. We like a white sheet because they are translucent. We can see the positioning paper below the Teflon/Pressing sheet.
We put the positioning paper on top of a light tablet. Then the Teflon/Pressing sheet on top of the positioning paper. Peel off the remaining fusible paper and position the pieces in numerical order on the Teflon/Pressing sheet. When we completed the rabbit, Lora tapped with the iron to fuse the pieces together. She moved the Teflon/Pressing sheet over and did the same thing with the tulips. We then had two units pre-fused together. Peel both units carefully off the Teflon/Pressing sheet after they have cooled.


Position the tulip unit and the rabbit unit on the over-sized background square. Fuse in place with a hot iron. I then chose a blanket stitch and in coordinating threads, I stitched along the edges. I have a Babylock but many Brother machines have the same Q appliqué stitch. Use whatever blanket or zigzag stitch you prefer. Don’t forget to switch to an open-toe foot so you can see what you’re sewing. Go slow, count your stitches. 1-2-3-4, 1-2-3-4, over and over. It allows me to anticipate the bite stitch so I can stop, start, or pivot when it isn’t going to bite into the appliqué piece.


There is an appliqué piece for that sparkle in the eye. No way could I really appliqué that tiny circle. I added a French knot with some white floss. You can also add a little dab of fabric paint if you prefer.

At this point it is done and ready to quilt. You can choose to trim it to 12 1/2″ now or after you’re done quilting. Too cute, right? Lora quilted the darling little quilt with her long arm. Yes. She. Did.

Youtube
Lora and I have several fusible appliqué tutorials on our Youtube channel. Click on the blow link and type fusible applique in the search window. A half a dozen or more appliqué tutorials will pop up.
https://www.youtube.com/@materialgirlfriendspattern4612
Download Your Spring Rabbit Pattern
Click below to download your copy of the Spring Rabbit Mini-Quilt pattern. Send your friends to collect their free download too. This free download expired, March 31, 2025. Sorry, you missed it. You can purchase a digital download on our Etsy store or a paper pattern on our web store.
____________________________
February 15
Annually in January, Lora and I go through our sewing rooms cleaning, purging, organizing, and vowing not to buy more fabric until we’ve used some of our stash. Are you with us?! Our second pattern for this year is a scrappy Double Irish Chain.
We actually have two Double Irish Chain patterns. The February free download Double Irish Chain is our scrappy version made from 2 1/2″ squares from your stash. It is a 54″ square throw size quilt. The other Double Irish Leaves is not scrappy but made from fabrics cut into strips. Two different piecing techniques, yet both are beautiful Double Irish Chain quilts. The scrappy Double Irish Chain is our free download for February.
Double Irish Variations

The Double Irish Chain samples in the February Free Download pattern
The Double Irish Chain block has been a quilter’s favorite for centuries. Published in the Ladies Art Company in 1897, this historic quilt design may be an oldie, but is loved by both modern and traditional quilters today. The design is made from two blocks. You’ll want to make twelve Four Corners Blocks and thirteen Double Irish Chain Blocks to create this 54″ square throw quilt.


Squirrel. Oh, how time evaporates when I’m on Pinterest. However, if you can manage your minutes, you can find double the inspiration and design ideas. Check out our Pinterest board for Double Irish Chain color and placement ideas.
I hope I didn’t loose you for long. Aren’t the options amazing?! Do you see why we had to have two versions of the Double Irish Chain pattern, scrappy and not-scrappy? I knew you’d understand.
Choosing Your Fabrics
How do you choose fabrics for a scrappy quilt? Just throw everything in? Well, no. For a successful scrappy quilt, I offer this one simple guideline.
Coordinate your colors. The prints themselves don’t bother me as much as the color. I’ll blend all types of print genres – batiks, novelty, country, modern, civil war, 30s, etc., as long as the color palette plays well with each other. Many times you can find your color palette from choosing a multi-color print and then pulling all the colors to match that one print.
Lora falls in love the the backing fabric first, then pulls colors from the multi-color backing to choose the colors for the front. Or if not the backing, she’ll choose her border fabric with multiple colors and then pull the scrappy fabrics to match her border. The one multi-color fabric coordinates the entire scrappy palette. She is brilliant when it comes to coordinating colors and seemingly pulls colors from the air to make a lovely palette.
For the color palette below, I was just in a mood. I was choosing colors based on my emotional needs (see February 2025 blog post). It has been a dark, cold winter and I was ready for spring. I pulled together creamy lights (my favorite words-on-fabric), neutral dark grays to enhance my medium value happy-spring-greens, and peaceful-carefree-aquas. I like working with Light, Medium, Dark values. Contrast create beautiful designs in quilts. If you looked at the Pinterest board, did you notice the placement of the color values?

Miss Maggie Kelly
My dear sweet Irish niece will be marrying her true love in April. I’ve been working on a Double Irish Chain quilt for her. I’m getting close to having the quilt top done. I added more blocks to make it queen-size. She is an artisan baker for a local coffee/bakery shop. I had this recipe card fabric in my stash that was perfect to feature in the Corner Square blocks. I added music fabrics too. I didn’t stray too far from my original color palettes. (Am I in a rut?!) I chose a dark bitter browns, then medium greens and a medium aquas. I did strip piece since I used yardage instead of 2 1/2″ squares. I was too low on my aqua and green scraps to make it super scrappy. All the same, I’m really happy with the results. Now to sew the rows together and add the borders. A lot of the fabrics I used were from Material Girlfriends lines, designed by her aunties, so I think that will make it special too.


Download Your Double Irish Chain Pattern
Click below to download your copy of the Double Irish Chain pattern. Send your friends to collect their free download too. This free download will expire, February 28, 2025. Sorry! You missed the free download. You can purchase a digital download on our Etsy store.
https://www.etsy.com/listing/963165734/digital-download-double-irish-chain?crt=1&sts=1
____________________________
January 15
Pattern link is at the end of the January 15 post.
Let it begin! Introducing My little Cottage Quilt. This cute pattern has instructions for a place mat size quilt. It would be cute as a center-piece quilt for your table too. I love these little houses. I tell you the truth, scouts-honor, I’ve already made 96 of these little houses and I want to make more. I see you scrolling through the web, looking up “Quilters Looney Bin” to have me committed. Well, its an unlisted number. Oh, wait! I just looked it up and there is a Looney Bin Quilting in Florida. I have found my tribe. Ha!


Is this a paper-pieced or a regular pieced pattern?
Both. You can choose your preferred method. Personally, I love paper-piecing. I have a video tutorial if you’re new to paper-piecing, a bit rusty, or would like company as you sew.
At first, I found paper-piecing crazy confusing. After failed attempts at learning the technique. I went to the University of YouTube. I watched several different paper-piecing videos (aka foundation piecing) and combined a few of the techniques and create my own method. My method doesn’t waste a lot of fabric, has easier fabric placement, fast, and accurate. However, if you have a method that works for you, don’t let me slow you down or mess with your mojo. There are so many roads that lead to paper-piecing Rome.
If you want to try paper-piecing, cut fabric for one house. The fabric sizes are in the pattern download. Give it a go. There are lots of video tutorials out there. If my method doesn’t work well with your brain, watch a few different methods! I’m sure there is a method that will work for you too.
Regular Pieced Houses
Not too tough, but they are tiny. The house block will measure 4 1/2″ after sewing it together. It will be 4″ Finished Size (in the quilt without the seam allowance measured). You’ll make Flying Geese for the roofs. When constructing the house, be sure to have an accurate 1/4″ seam. Go slow, and have fun! Regular-pieced houses and paper-pieced houses are the same size.
What Colors will You Choose?
The fabric requirements for this mini quilt are simple. You’ll need four fat quarters or 1/4 yards. It is a petite 20″ x 16″. Even the border can be cut from a fat quarter (Fat quarters generally measure 18″ x 22″. Just double check that your fat quarter is at least 20 1/2″). You’ll need 1/4 yard for binding and 2/3 yard for backing. All the scrap batting you’ve been saving can now be used! You’ll need about 28″ x 24″ batting size. Lora embellished My Little Cottage quilt with adorable heart shaped buttons and I love the red accent flange.


Think about using holiday or seasonal fabrics. Lora did make kits. The kit is the same fabric in the pattern cover image and makes one My Little Cottage quilt and includes the red heart-shaped buttons.
Scrappy Version
Every January, Lora and I take a deep breath and dive into our sewing rooms. We deep clean, sort bins, tidy fabrics, organized projects, make our lists, and swear we aren’t buying more fabric until we make a dent in our current stock. My Little Cottage Quilt is perfect for scraps. How many bins of little scraps do you have. None? Seriously? Oh… well… Looney Bin, again.

Super-size Me
Let’s make more than 10 houses. Let’s make a village, a town, or maybe a city of little houses! This is EQ8 sample is 121 little houses. I added 2 1/2″ x 4 1/2″ sashing and 2 1/2″ posts in alternating colors. Border and flange are the same width as the placemat size. After all that sewing, the quilt will be a modest 60″ square. Whew. Lots of work and it isn’t even bed size!

Here is another candidate for the Looney Bin. 618 little houses! I thought my houses were small at 4 1/2″ but Kathy Beeson’s houses were just 3″!! Very cool and quite the inspiration.

Let’s Get Sewing!
Click below to download your copy of the My Little House Quilt Pattern. Send your friends to collect their free downloads too. This free download will expire, December 31, 2025. Yes, this one is special. It will be a free download all year.
Lora had a fun idea. How about making this a block swap with your quilting friends? Wrangle 10 friends, each make 10 houses, then swap the houses with your quilting friends. It would make a very special mini-quilt.
If you have trouble with the download, email Lisa@materialgirlfriends.com